Pages

Wednesday, June 26, 2013

Who likes leftovers?

I'm not talking about food.  Although, this would be a good time to mention that my father will live forever because he regularly eats leftovers which are over a week old.  Maybe a week is giving him too much credit, actually.  The eternal risk taker does the "smell test" to determine the fate of his life almost every day.  If he throws out food, you know it was probably growing something which could not be scraped or cut off.  Yum.  But, I digress... 

In this blog post, I'm talking about finally using some of the heaps of leftover fabric I have in the basement.  (I should mention, however, that we played with my grandmother's seemingly endless bucket of remnant sewing pieces as a child.  She kept things forever...so it must be an inherited trait.)
I decided to use what was left of the two fabrics I have in our kitchen to make some placemats for the relatively informal dining room.  However...let me just say here that I believe you should be careful when reusing fabrics from one room to another.  I think the look can be annoyingly redundant.  BUT, since we were going from the kitchen to the dining room, it felt alright.  Plus, these placemats aren't permanent.  M'kay?

The geometric blue print was used on the roman shades in the kitchen and the bicycle print was used here to recover the bar stools.  They work well together in both color and texture.
Duralee Ride Primary
I used my rotary cutter and self-healing cutting mat to get my fabric as straight as possible.  Um...I don't know if I was still humming from the night before or what...but the fabric in that picture doesn't look straight to me.  Just ignore that part. 
I wanted to add a little anthropologie-ish flair to these placemats, so I found some yellow jumbo sized ric-rac to border the edges.  Don't I have a cute assistant?
With right sides together, tuck the ric-rac to the inside of the fabrics and sew a 1/2" seam.  An important piece of advice: make sure you start sewing in the middle of the top or bottom edge.  You don't want to start on a corner because your ric-rac will not lay properly at the edges.  Leave an open space about 2-3" wide to turn the fabric right side out.  Make sure you clip your corners and press your hem before doing so.  This will give you crisp corners and edges.

After turning the fabric right side out, top stitch around the entire perimeter.  This will close your 2-3" opening and will give the placemats a clean and finished look. 
Here is another image of the finished project.  I am really happy with how they turned out.  They look fresh, fun, and summery in our dining room. 
duralee ride primary
The best part is, I've used them several times without having to machine wash them.  You know why?  I just flipped them over.  Bikes one day, geometric the next.  
Lazy?  Maybe.  Pretty and Smart?  Always.


Monday, June 10, 2013

10 months later...I'm back in the saddle, with a cocktail in hand.

My last post was 10 months ago.  Ooops.  I'm sure some of you (all 10 of you) have really missed my creative genius.  Please forgive me, I've been a little busy.


Evie just turned 9 months and I finally feel like I have some sort of order in my day.  Well, some days more than others (like the fact that she's been sleeping for 2 hours this morning...thus this little blog post).  I have been able to squeeze in a few projects and ideas here and there and I will be highlighting those in the upcoming weeks.  I have also been cooking up a storm lately, so I'll post some of my favorite meal ideas as well. 

But...first things first.  Let's start off the summer with a cocktail.  Mommies need a little pick-me-up juice around 5 o'clock...knowwhatimsayin? 

Last night was a beautiful night.  It was a perfect night for grilling and a perfect time for a drink on the patio.  We didn't have any wine or beer in the house so I was forced to get creative.  We have a ton of mint growing in our herb pots, so I started with that.  Then, I remembered that we had a cucumber in the fridge.  Perfect.  And...since I'm not a professional mixologist (although after a couple drinks I think I am), I went to the internet to find a drink recipe that incorporated mint and cucumber.  After reading a few, this is the concauction I created:

Makes 2 cocktails
- 4 slices of cucumber, 8 mint leaves, juice of 1 lime, 1/2 packet of stevia (I'm still working on my baby weight, folks...simple syrup is another option).  Muddle this together at bottom of shaker.
- 3 oz of vodka. Add this to the vegetables.  That's right folks, this is healthy.
- Couple handfuls of ice.  Shake it.  It's extra good if you can get your booty in the shaking as well.
- Pour into glasses.  Top with club soda.  Add a lime wedge if you want to get all Martha on it. 
- Enjoy.  Repeat.

I'm sure someone out there has made this drink before, but I couldn't find this particular recipe.  This recipe is close.

Sorry I don't have a picture of the cocktail.  I'm sure you can imagine it in your head.

Stay tuned for more!

Katherine

Thursday, August 16, 2012

Nursery Reveal

Finally!! 
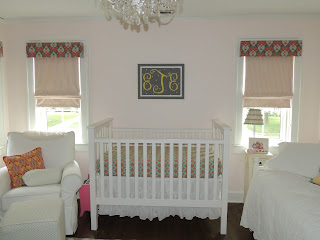
We have finally put the nursery together.  Its perfect...or imperfectly perfect (if you look super closely at some of the handmade stuff!)  It's so cozy and relaxing.  When I walk into the room, the personal touches make me feel so warm inside.  I think it really expresses how much we love and adore this little girl already.  There is one small thing that the husband has to finish (like wire the lighting and put a dimmer switch on the outlet...which is why the chandelier is not on), but other than that, we are ready to welcome this little baby into her new home.  I am SO happy with how everything turned out. 
Here is a tour of the room:
View from the door (other door pictured leads to the master bath...it's strange, old house.)  I made the roman shades and valances out of fabric I found online.  The fine custom artwork above the crib is also courtesy of these fine hands.  Please, no autographs.  The nursery chair and crib came from Pottery Barn Kids.  The ottoman was one that I had.  It used to be covered in a fine pleather, but I used a PBK curtain to recover it.  
Daybed (dog butt included).  The daybed was a craigslist purchase.  It was an ugly stained wood, but the husband painted it white to match the rest of the wood furniture in the room.  The artwork (close up in a few pics) was done by the husband when he was a small child.  LOVE them!  Not loving the reflection of the plexiglass that came with the frames, however.  I need to change that out for non-reflective glass.
Changing Table and bookcase (door on the left is the closet).  Bookcase came from PBK.  Changing table was $20 at a garage sale.  We spray painted it green.  The art above the changing table was done by my long time friend Sherry Helms.  She is an amazing artist.  I wish she had a website!
Close up of crib & chair.  The wall color is "Pink Kiss" by Valspar.
Close up of the husband's artwork.  Simply amazing.  These photos were the inspiration for the room.  His mom showed me these paintings in early spring and I knew they had to be apart of the room.  He wrote his name and phone number at the bottom of the elephant picture in his cute little kid handwriting too...adorable!  We aren't quite sure how old he was when he painted them, but we are guessing somewhere between 6-8 years old.  

I will be creating a few more posts to highlight specific DIY items in the room, but I wanted to get this post rolling so you all could see how the room came together. 

Thanks for reading!
Katherine

Friday, July 20, 2012

I want one too!

After my last ottoman re-upholstery job for my friend, I had some serious furniture envy.  For a while now, I have wanted something (a table, an ottoman) to go between the two chairs we have flanking our fireplace.  When I placed the soft cushion-y ottoman in that spot to take pictures for my last blog post, I knew that a fabric covered ottoman was the perfect solution.  Even though it's still the pit-of-hell-hot outside, I envisioned the husband and I sitting in front of the fireplace, warming our toes on a shared ottoman.  Now, I just had to find one that would work. 

Luckily, it was the first weekend of July and Kansas City's West Bottoms district was open for business.  I LOVE going down to these sales once a month.  It's like a vintage resale/restore paradise.  Stores like Good JuJu, Bella Patina, Broncante Bliss and about 20 others open for the first Friday, Saturday and Sunday of every month with tons of one-of-a-kind items.  Potentially overwhelming amounts of furniture, home decor items, vintage clothing and jewelry are ready for the taking.  In my opinion, it's best to go with a specific item(s) in mind, otherwise you can be totally lost in a sea of "stuff."  Some people might like this idea...but when it's 100 degrees outside and you are cruising around old buildings without AC, I'm all about zoning in on the task at hand.  

After about 3 stops at various stores, I found this beauty for $20. 


It was the perfect size and shape...and for 20 bucks, I didn't feel guilty for spending money on something that wasn't for the nursery!  Not quite sure when black crushed velvet was all the rage (maybe in the early 90's??...maybe never!), but I knew it wouldn't take much fabric to make this piece work in my home.  I played around with some different fabric concepts and settled in on a light beige animal print with a brass nail head trim accent.  I thought it would be neutral enough that it wouldn't fight with other furniture and accent pieces in the room, but yet give a touch of interest and personality.  I found the fabric through a Google Images search of "light cheetah upholstery fabric."  To my delight, I found someone on Etsy.com selling a remnant piece of expensive Calvin fabric.  It was the perfect color, texture (heavy woven cotton), size and price.  I paid $32 for 2 1/4 yard (this was literally the exact amount I needed)...such a deal!!  The nail head trim was found here.  As soon as the fabric and trim arrived, I went to work.

First, I took the black fabric off.  I decided to keep the top layer of fabric on because it was sewn into the cushion.  I carefully (can't make a mistake...limited amount of fabric here!) cut the right size fabric for the top and 4 pieces for the 4 sides. 

I stapled the top piece around each side, lightly pulling the fabric taut.


 I spent some time on the corners making sure they looked as tailored as possible.


I sewed the 4 sides together to form a box.  Turned the ottoman over and slid the fabric into place.


 Here, I used upholstery tacking strip to make nice, straight folds for my side seams.


 Make sure you keep the staples close to the top of the fold you created.  Otherwise, the brass tacks will not hide the staples.  (learning from mistakes!)  Photo of stapling the side fabric to bottom of frame not shown, although it should be pretty self explanatory.


Attaching the tacking strip is actually pretty easy.  It is much easier to use the strip tape instead of the individual nails on a job like this, since all of my nail trim lines were straight.  Get a small tack hammer like the one I have in the picture.  I was lucky enough to raid the husband's tool box and find this perfect little tool.  You might want to wear gloves in this step...or maybe it was just me, but my fingers were cut from the sharp metal edges on the strip.


And...scene.  Here she is...isn't she lovely!


Here is a picture of the living room with her new companion.  It fits so perfectly!


Total cost for the project was about $85.  Such a deal!  So glad I have projects like this to keep me and my 7 1/2 month belly occupied in the AC on my days off from work. 

Thanks for reading!

Katherine

Sunday, July 8, 2012

Goodbye Granny, Hello Chic!

My dear friend back at home has inherited a ton of awesome furniture from family over the years.  Every piece is in great condition.  You should see her dining room set, it's amazing!  The only exception is a heinous chair and ottoman she has in her living room.  Well, really the bones of the furniture are fine, it's the fabric that needs some serious updating. 
 
We went to the local Hancock Fabric store and found this amazing heavy duty upholstery fabric on clearance for $6.00 a yard!!  We bought all that was left on the bolt and at $18.61 later, we were in business.  Such a deal! 

Here are some progress pictures of the transformation along with a short recap of what I did to transform this grandma ottoman into something more modern and chic.
First, I ripped off the lovely skirt.  Yikes!

Then, I made a template for the top piece of fabric

I cut out the top piece and added 1" to each side to allow enough seam allowance.  Normally, I would only cut an extra 1/2" to 3/4", but I gave myself a little extra since the fabric was so thick.

Here I am sewing the piping for the top and bottom of the ottoman.  Here is a great tutorial on how this is done.

The following steps are not pictured (I was focused and forgot to take pictures...sorry!):
-Cut 2 pieces for the sides (1 long + 1 short = 1 piece). Sew them together at both ends.
-Sew the top piece and the piping together. (See previous link for instructions...I'm clearly not a good instructor!)
-Sew the top piece with the piping to the bottom piece. Make sure you pin this well. You don't want the 2 pieces of fabric to move on you...it will look dumb and uneven.
Staple each side, starting from the middle out to the ends.

Here is how I handled the corners...I folded them down and secured the fabric as I was applying the piping trim.  I thought it looked the best, but then again...I'm not an expert...but I worked for me.

I was a little unsure how I wanted to handle the bottom piping.  Looking back, I should not have cut off the excess like I'm showing in this picture.  It would have been much easier to staple with the extra fabric.  Alas...I made a few errors with the staple gun, even though I was VERY careful not to get my staples into the hard part of the piping as I secured it around the bottom edges.  I cut it off because I thought it would look the best around the corners.  In hindsight, I should have just cut off the excess around the corners and used a glue gun to secure.  Oh well, live and learn.

Tada!!!  Short side view

Yeah!  It looks SO MUCH BETTER!! 
Total cost for materials:  About $20
Total time investment:  About 3 hours
This was such a fun project...I decided to find an ottoman to recover for my own home.  I found a little gem at a local flea market for $20.  It's the perfect size and certainly the perfect price.  I can't wait to share that project as well!

Hope everyone has a great week!

Katherine

Wednesday, June 27, 2012

Getting Fancy on the 4th

Who doesn't love the 4th of July?  Seriously, one of the best holidays of the year, in my opinion.  My love for this holiday probably comes from my parents.  For years, they have been hosting a 4th of July party at their house.  They have all of their friends over, everyone brings a side dish and my dad enjoys the day outside drinking beer and grilling the most amazing hamburgers on his 25 year old Hasty Bake grill.  It's summertime at its finest.  (If you don't know about Hasty Bake grills, you need to check them out here.  They are the best grills and just might change your life.) 

So I have to say, I am super disappointed that we will not be in attendance at this year's party.  It's one of the cons of living 4 hours away and being 30 weeks pregnant.  However, I am going to try to strike up my own little party here in Kansas City with some red, white and blue love, even if it's just a party of 2 (and a half). 

Your 4th celebration doesn't have to be a blow out (no pun intended), but adding a few of these ideas just might make you feel patriotic...and a little bit fancy.


Pink and red peonies in a turquoise pitcher - love!
Better Homes and Gardens

Handmade napkin rings out of grograin ribbon - so easy!
Martha Stewart

Yum!
Scrambled Henfruit
Simple & easy...(change ribbon for different holidays too!)
Tip Junkie

Monday, June 25, 2012

Riding high on my new bar stool cushions!

I am excited to share a new project I completed the other day.  We have 3 bar stools in front of our kitchen island which we use at least a couple of times a day.  These things show wear and tear pretty quickly.  In fact, this is the second time I have recovered these chairs in the past year.  However, this time I think I was a little smarter...I hope.  I chose a more durable fabric (a very sturdy cotton instead of the drapery grade poly-type crap the last time) and I took the time to have the seats scotch-guarded before attaching them to the chair.  I also made my own piping for the chairs this time around.  It took a little extra effort, but I think the extra detail really makes the chairs have a more professional and finished look.  Here are some pictures of the process (I apologize in advance for the terrible iPhone pics):     Enjoy! 


Step 1: Make your piping (or buy it).  For all that's good and holy...if you have a zipper foot...use it when sewing piping.  I do not currently own a zipper foot for this machine and I'm sure this process is much less irritating when you have the right equipment.


Step 2: Remove old fabric.  I didn't take a picture of the original cushion because I was slightly embarrassed at how funky it had become.  Just trust me...it was time to recover.  Make sure all of your old staples are out of the wood!  Use pliers if necessary.
Step 3: Attach new fabric with a staple gun.  I kept the original original fabric on the chair because I thought it gave a little extra cushion.  You could take off the original fabric if you wish.  Start of one side and staple the fabric to each side, starting in the middle, stopping about 1 1/2" from each corner.  (Yes, that is a power tool you are looking at and yes, it's awesome.  My husband bought me a pneumatic stapler and it is such a lifesaver on projects like this.  It is fueled by an air compressor, so you get a ton of power, which is nice when you have one hand holding the fabric and the other on the stapler.)
Step 4: Fold your corners.  This is probably the most frustrating part of the process.  You want to fold the corners in such a way that you don't have lots of pleats on the front side of the cushion.  Tuck the fabric into itself and make 2 pleats for each corner.  Staple where the fabric comes together.  Give it a couple more staples on either side to further secure.
Step 5: Attach piping. I'm not sure what happened to my photo of this step. So, you'll just have to use your imagination. Basically, I attached the piping (with a 1/2" seam allowance) to the bottom edges of the cushion. Make sure you are close enough to the edge of the cushion to be able to see the piping when the cushion sits on the chair frame. Make small slits in the seam allowance along the edges so you get a nice rounded look. 

Steps 6 & 7: Protect your fabric w/ Scotch-Guard.  Attach to your chair frame.  Voila!  New bar stool chair cushions.